The Dialog API in Drupal 8
On a recent Drupal build, a key requirement was to provide a quick and easy way of presenting a user with information without reloading the entire page. This was easily achieved using the Dialog API which provides a simple way of loading interactive content within a dialog window. The embedded content can range from forms, static text, or the results of an external API request.

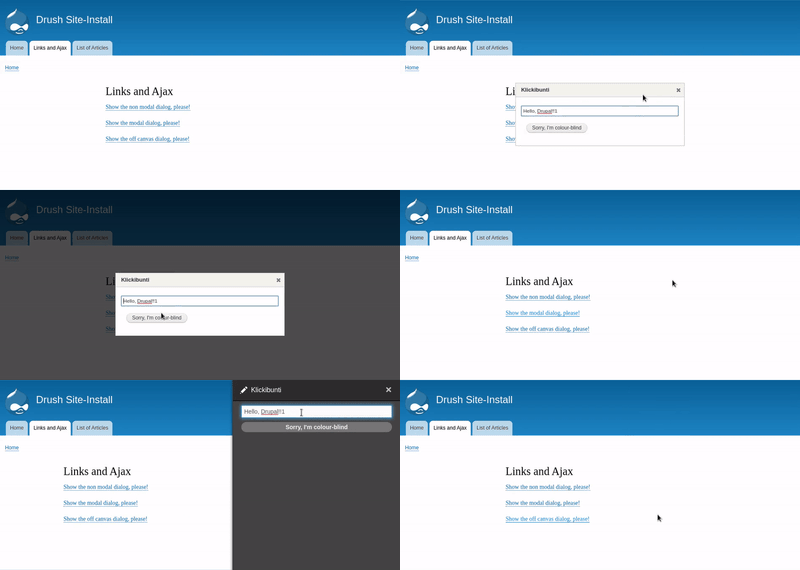
The Dialog API provides 3 different types of dialog:
- Modal dialogs - This type of dialog overlaps the entire page, preventing other interactive actions on the page while the user interacts with the dialog
- Non modal dialogs - This type of dialog stays at the top of the page allowing a user to click on other interactive elements whilst the dialog is open. Multiple dialog windows can be opened at the same time.
- Off canvas dialogs - Instead of using a popup, this type of dialog displays an off canvas dialog which slides into the page, moving content to one side.
For our requirement, modal dialogs were the best candidate. We wanted to prevent other actions from being completed whilst the dialog was open, giving more focus on the presented information, leading to an improved user experience.
A solution
Prerequisites
The first step when using the Dialog API is to ensure the required libraries are loaded. This is added in the custom module which provides dialog functionality. To do this, the libraries were loaded as dependencies within a libraries.yml file in the custom module. my-module/libraries.yml
my_library:
    version: 1.0.0
    css:
        theme: css/example.css {}
    js:
        js/example.js: {}
    dependencies:
        - core/drupal.dialog.ajax - Required to display a dialog
        - core/jquery.form - Optional, If the dialog should support Ajax form interactions
The library is then loaded on pages which require dialog functionality. This is achieved by including the library in the related twig template, giving greater control over where the library should be loaded.
{{ attach_library(my_module/my_library’) }}
There are several ways to include a custom library. More information on the various approaches can be found here: https://www.drupal.org/docs/8/creating-custom-modules/adding-stylesheets-css-and-javascript-js-to-a-drupal-8-module
Displaying the dialog
In most cases a dialog is opened by a user clicking a link or a call to action (such as a button). In our case it was the latter. Our template contained markup to display a button call to action. When a user clicked this button, we wanted to open and load custom content into a dialog window. We simply added the ‘use-ajax’ class to the desired button to enable dialog support.
<a href="/my-custom-callback"
  class="btn btn-outline-primary btn-sm btn-nowrap use-ajax"
  role="button"
>
  Click me
</a>
The important pieces of information above are the href value, which should point to a custom route (more on this next), and the ‘use-ajax’ class which must be added to enable dialog support. The custom href value above must start with ‘/no-js’ followed by the remaining values for the link. For example, ‘/no-js/my-custom-callback’. The next step was to add a custom routing.yml file in the module which contained the above link with some minor changes. my-module/routing.yml
my_module.showmodal:
      path: '/ajax/my-custom-callback'
      defaults:
        _controller:
          'Drupalmy_moduleControllerMyModuleController::showModalResults
      requirements:
        _permission: 'access content'
The key information here is the path: value which must start with ‘/ajax’ followed by the link value. Also included is a controller path (responsible for returning the response data to display within the dialog) and the permission a user needs to access this link. For our requirement, ‘access content’ was sufficient. Note** The link convention must be correct for the dialog to display e.g. ‘/no-js/my-custom-callback’ (for the call to action which opens the dialog) and ‘/ajax/my-custom-callback’ for the link in the routing.yml file. Finally, the custom controller was added to the module which returns the response data to display within the dialog. my-module/src/Controller/MyModuleController.php
namespace Drupalmy_moduleController;
    use DrupalCoreAjaxAjaxResponse;
        /**
         * @return AjaxResponse
         */
        public function showModalResults()
        {
            $response = new AjaxResponse();
            $content = 'This content will be loaded in the dialog!'
            $response->addCommand(new OpenModalDialogCommand(
              'My Dialog title',
              $content,
              ['width' => '576px', 'height' => 'auto'])
            );
            return $response;
        }
The method was defined above in the routing.yml file. This method will be called when a user clicks on the call to action button. The method is simplified to show a basic response. As we are returning the data using Ajax, the DrupalCoreAjaxAjaxResponse class include is required. I then create a new Ajax response using this class. In this example the data returned is a basic string, however this could be a custom form or the results of an API request. A new OpenModalDialogCommand is then added to the response and returned.This class accepts 4 parameters; the title of the dialog which is displayed above the content, the dialog content itself, dialog options which can be used to control basic settings such as width and height (more information here:https://api.jqueryui.com/dialog/), and any custom settings. This will result in a popup showing the content displayed within a modal dialog.
Caveats
By default, the dialog can only be closed by clicking on the ‘X’ icon in the top right hand corner of the dialog. Custom Javascript behaviour can be added allowing the dialog to be closed if a user clicked anywhere outside of it, giving a better user experience. The default JQuery dialog window looks quite bland, however this can easily be overridden using custom styles.
Summary
The Dialog API provides a quick and easy way in Drupal core to display content within a modal without the need of any 3rd party libraries, reducing the amount of code needed to create a dialog, as well as improving the user’s experience by not having to navigate away from the page they are on.
Let's chat. Tell us a bit about your project.
If you prefer to speak with someone, call 01202 203160 or if you'd like to book a 30 min meeting to see if we can help just let us know and we'll arrange a call with one of our Directors.